What is GitOps?
Putting it simply, it is how you do DevOps in Git. You store and manage your deployments using Git repositories as the version control system for tracking changes in your applications or, as everyone likes to say, “Git as a single source of truth.” It gets a bit more complicated when you start to talk GitOps in Kubernetes.
The challenge is that when you talk about GitOps in Kubernetes, this is directly tied to tools that still require you to build and manage things like Helm charts, Kustomize, or other similar approaches. This means that your developers and DevOps teams will always have to manage these charts, what variables are used, what changes are made to them, and more. Not to mention, the application’s post-deployment operation capabilities are minimal with these tools, enforcing governance and controls is challenging, and more.
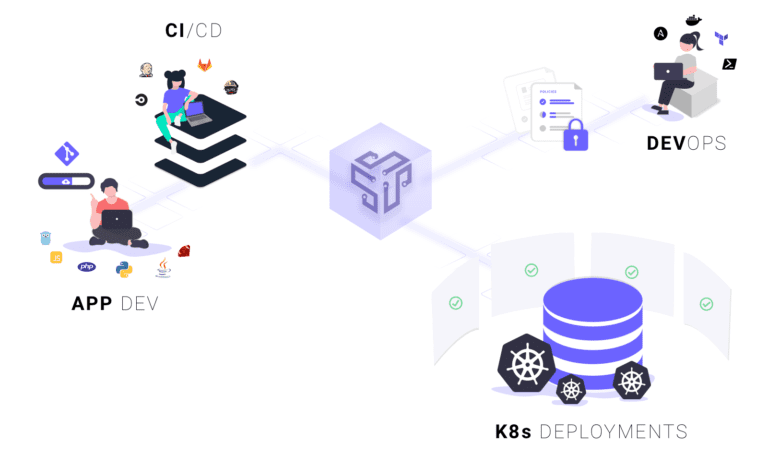
We want to introduce you to an application-centric way of doing GitOps in Kubernetes. We will be using Shipa and GitHub Actions (You can use any Git repo or CI tool of choice).
In the end, that’s what we want to deliver:
In this example, we will learn how to construct the GitOps in Kubernetes workflow using GitHub, GitHub Actions, and Shipa. In the end, you will see that you were able to build a GitOps workflow without the need to learn, build, and maintain Helm charts and other Kubernetes-related objects.
Requirements
In this example, we assume you already have a Kubernetes cluster running and can access that cluster with kubectl. We will be using a cluster in GKE (Google Kubernetes Engine), but you can use any other cluster you’d like.
Installing Shipa
Installing Shipa on Kubernetes is as easy as 1, 2, 3:
- Create a namespace for Shipa’s components:
$ kubectl create namespace shipa-system
- Set an email address and password to log in to Shipa:
$ cat > values.override.yaml << EOF
auth:
adminUser: myemail@example.com
adminPassword: mySecretAdminPassw0rd
EOF - Add Shipa’s Helm repository and deploy Shipa:
$ helm repo add shipa-charts https://shipa-charts.storage.googleapis.com
$ helm install shipa shipa-charts/shipa -n shipa-system —-timeout=1000s -f values.override.yaml
You can watch Shipa being deployed by listing all the pods in the shipa-system and shipa namespaces:
$ kubectl get pods --all-namespaces -w | grep shipa
Once Shipa’s components are up and running, install the Shipa CLI in your system:
$ curl -s https://storage.googleapis.com/shipa-client/install.sh | bash
You can verify that Shipa is installed successfully by running shipa version.
Adding a Target to Shipa
Before you start interacting with Shipa using the CLI, you need to configure a target (which tells the CLI where to find Shipa’s backend in your Kubernetes cluster). To configure a target, you first need to obtain the IP address (or DNS name) of Shipa’s server. To do that, run the following:
$ export SHIPA_HOST=$(kubectl --namespace=shipa-system get svc shipa-ingress-nginx -o jsonpath="{.status.loadBalancer.ingress[0].ip}")$ if [[ -z $SHIPA_HOST ]]; then
export SHIPA_HOST=$(kubectl –namespace=shipa-system get svc shipa-ingress-nginx -o jsonpath="{.status.loadBalancer.ingress[0].hostname}")
fi$ shipa target-add shipa $SHIPA_HOST -sThe code above obtains the DNS name of the Load Balancer that is serving traffic to the Shipa server, which, in turn, serves traffic to Shipa. The output of the shipa target add command will look similar to:
New target shipa -> https:/xxx.xxx.xxx.xxx:8081 added to target list and defined as the current targetAccessing the Shipa Dashboard
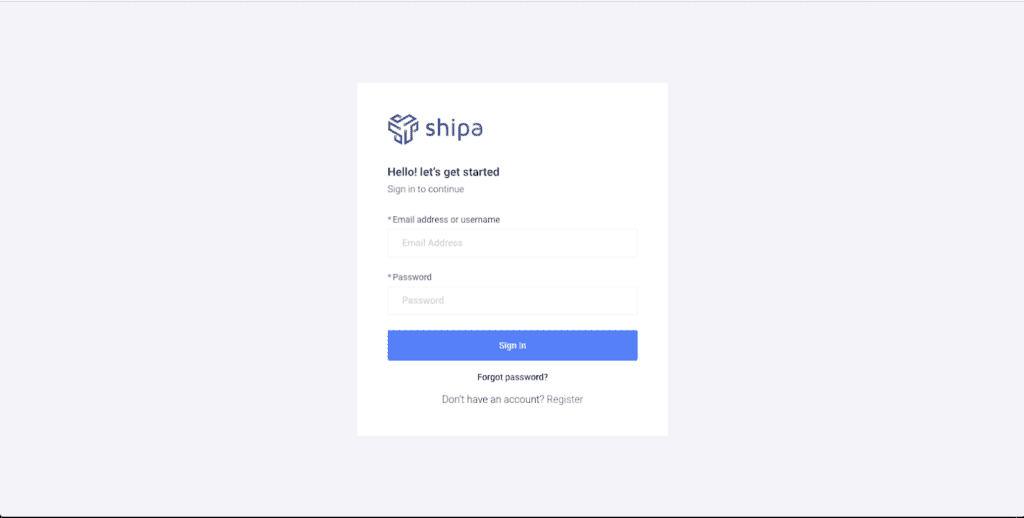
After a few minutes, you should be able to access the dashboard. Copy the shipa target address without the port and paste it into your Web Browser address bar, setting the port to 8080 (i.e., https://xxx.xxx.xxx.xxx:8080). You should see the following:

Click on the Go to my Dashboard link. Once on the Dashboard, input the email address and password you set earlier.
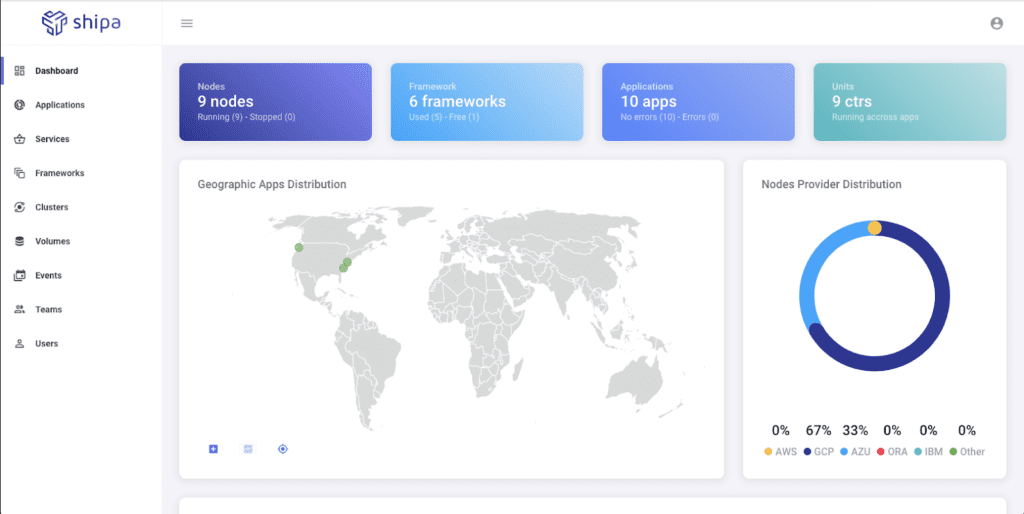
Once you log in, this is how your Dashboard should look:
You can find more information on installing Shipa here https://learn.shipa.io/docs/installing-shipa.
Creating an Application on Shipa
Now we will create an application on Shipa, which is where we will deploy our code. You can create an application on Shipa using either the CLI or Dashboard. In this example, we will use the Shipa CLI:
$ shipa login
$ shipa app create gitops -t shipa-admin-team -o shipa-framework
CI/CD Pipeline with GitHub Actions
To demonstrate the full pipeline, I am using a web application called DevOps Toolkit, originally developed by (and forked from) our friend Viktor Farcic. You can find the Git repo here https://github.com/brunoa19/devops-toolkit.
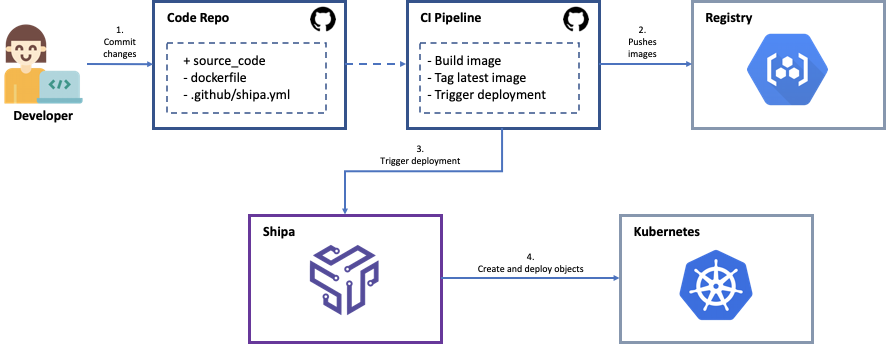
We will be using GitHub Actions to help us build the image, push it to Google Container Registry, and trigger the deployment using Shipa, so let’s look at how the pipeline is constructed.
GitHub Secrets
Let’s create the required secrets! To get started, go to the “Settings” tab in your project and click “Secrets” in the sidebar. Click on “New repository secret.”
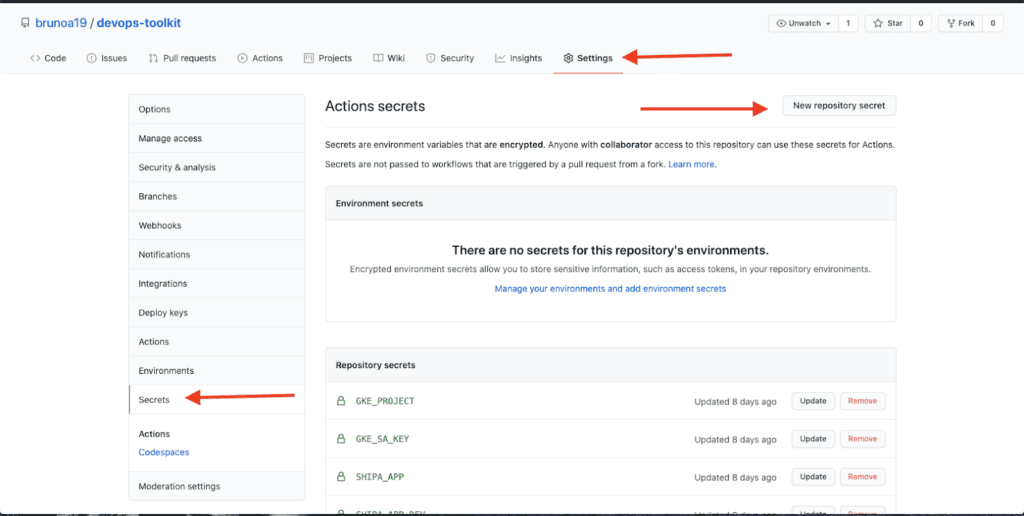
You will need to create the following secrets:
- GKE_PROJECT: The name of your project where your GKE cluster is located in your Google cloud account
- GKE_SA_KEY: The service account used for the project with the Base64 encoded JSON service account key. More info available at https://github.com/GoogleCloudPlatform/github-actions/tree/docs/service-account-key/setup-gcloud#inputs
- SHIPA_APP: The name of the application we created on Shipa in the steps before that we will use to deploy our application (gitops in our case)
- SHIPA_USER: The username you use to access Shipa
- SHIPA_PASS: The password you use to access Shipa
- SHIPA_SERVER: The IP of your Shipa instance (without HTTPS and port number, just the IP)
Using the GitHub secrets in your workflow is relatively straightforward. Each secret gets added as an environment variable prefixed with “secrets,” which means we can easily use them when creating our config file.
Pipeline Settings
name: DevOps Toolkit - Prod

on:
  push:
    branches: [ main ]
  pull_request:
    branches: [ main ]

env:
  PROJECT_ID: ${{ secrets.GKE_PROJECT }}
  IMAGE: static-site
In this example, we will use our actions when there are either push or pull requests on our “main” branch. Our pipeline config file is stored inside .github/workflows directory, using a file called shipa-ci.yml
The steps below build our DevOps Toolkit image using the Dockerfile present in the repository and, once built, store the image in our Google Container Registry.
jobs:
  setup-build-publish-deploy:
    name: Setup, Build, Publish, and Deploy
    runs-on: ubuntu-latest

  steps:
  - name: ACTIONS_ALLOW_UNSECURE_COMMANDS
    id: ACTIONS_ALLOW_UNSECURE_COMMANDS
    run: echo 'ACTIONS_ALLOW_UNSECURE_COMMANDS=true' >> $GITHUB_ENV

  - name: Checkout
    uses: actions/checkout@v2

  # Setup gcloud CLI
  - uses: GoogleCloudPlatform/github-actions/setup-gcloud@0.1.3
    with:
      service_account_key: ${{ secrets.GKE_SA_KEY }}
      project_id: ${{ secrets.GKE_PROJECT }}

  # Configure Docker to use the gcloud command-line tool as a credential
  # helper for authentication
  - run: |-
      gcloud --quiet auth configure-docker

  # Install Hugo
  - run: |-
      wget https://github.com/gohugoio/hugo/releases/download/v0.55.4/hugo_0.55.4_Linux-64bit.deb
      sudo dpkg -i hugo_0.55.4_Linux-64bit.deb

  # Build Hugo and Docker image
  - name: Build
    run: |-
      make build
      docker build
        --tag "gcr.io/$PROJECT_ID/$IMAGE:$GITHUB_SHA"
        --build-arg GITHUB_SHA="$GITHUB_SHA"
        --build-arg GITHUB_REF="$GITHUB_REF"
The step below sets up Shipa
  # Setup Shipa CLI
  - run: |-
      sudo wget https://storage.googleapis.com/shipa-client/1.2.0/shipa_linux_amd64
      sudo chmod +x shipa_linux_amd64 && mv -v shipa_linux_amd64 shipa
      ./shipa target add shipa ${{ secrets.SHIPA_SERVER }} -s
      echo ${{ secrets.SHIPA_PASS }} | ./shipa login ${{ secrets.SHIPA_USER }}
The final step in our pipeline triggers the deployment using Shipa
  # Deploy the Docker image to the cluster through Shipa
  - name: Deploy
    run: |-
      ./shipa app deploy -a ${{ secrets.SHIPA_APP }} -i gcr.io/$PROJECT_ID/$IMAGE:$GITHUB_SHA --step-interval=1m --step-weight=10 --steps=6
A few things to notice during the deployment:
- We are deploying to the app we created on Shipa using the previous steps and set up using the SHIPA_APP secret
- We are deploying using canary. If you want to run a straight deployment, just remove the –step-interval, –step-weight, and –steps flags
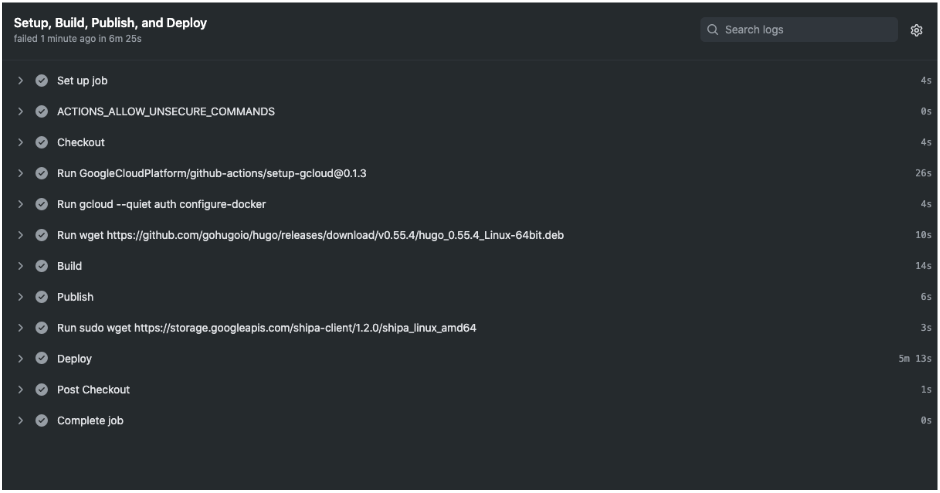
As we push code to the main branch, we can see that GitHub Actions started doing it’s job all the way to triggering the deployment through Shipa.
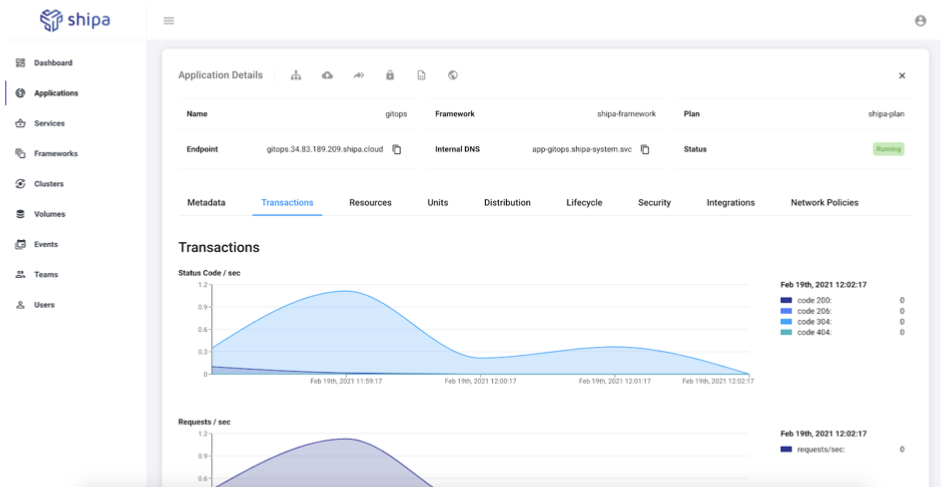
As the application is deployed, we have complete observability using Shipa.
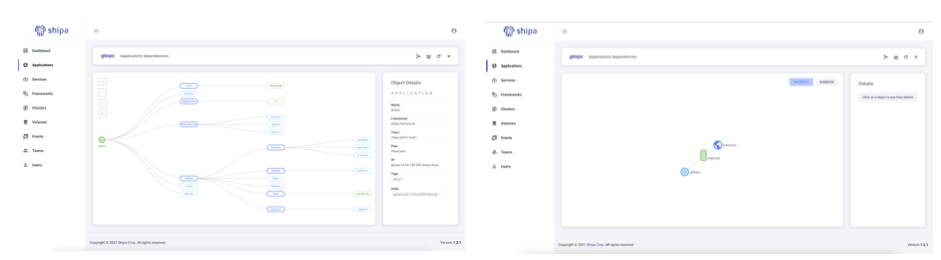
We can also have a complete overview of the application’s object and network dependency map:
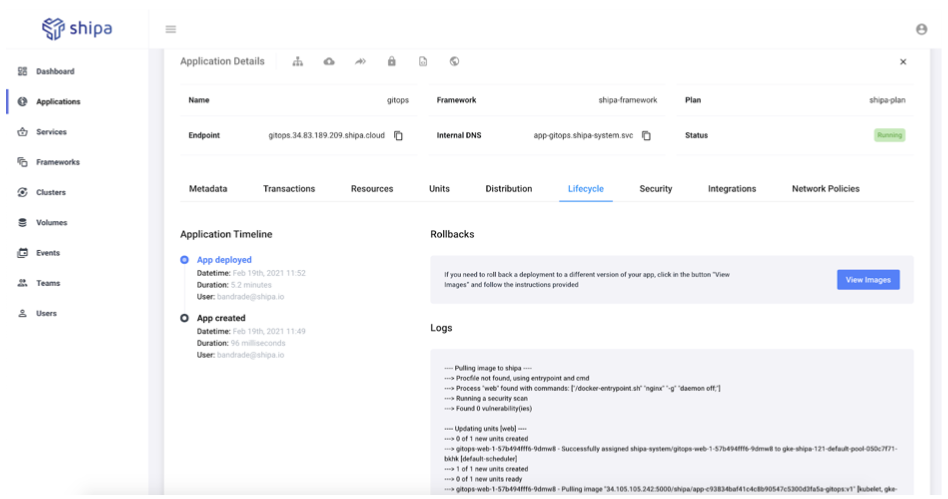
We can see the detailed lifecycle of the application, with information and logs associated with every action taken:
Much more can be done with Shipa to operationalize Kubernetes and GitOps, such as security scans, RBAC, network policies, and more for operating your applications. With Shipa, you can not only deploy your apps, but you can manage them as well.
Another great point to mention is that we have done this all without creating Helm charts, Kustomize, deployment objects, services, etc. Shipa makes GitOps in Kubernetes much more dynamic and application-focused.
Thanks for reading this post. I hope you have a clearer picture of an application-centric GitOps model.
In the next post, we will cover how you can build an enterprise-level GitOps workflow. Stay tuned!
Resources
Shipa home – https://www.shipa.io
Try Shipa free – https://www.shipa.io/getting-started/
DevOps Toolkit app – https://github.com/brunoa19/devops-toolkit
Share on email
Email
Share on twitter
Twitter
Share on linkedin
LinkedIn