Deploying a real-world application on Kubernetes
We see people talking more and more about Kubernetes these days, and if I have to guess, these conversations will continue to grow. Still, the reality is that most enterprise companies are just starting to explore Kubernetes, or they are at the very early stages of scaling it.
As you deploy production-grade apps on Kubernetes, both developers and DevOps teams realize that operationalizing applications on Kubernetes can be way more complicated than expected. Even further, that complexity grows as you start deploying distributed apps across multiple Kubernetes clusters, set up network policies, RBAC, and more.
It has been nothing short of amazing to see Shipa’s wide adoption as we start seeing Shipa being used as the default application management layer for Kubernetes by teams everywhere. With that, we wanted to show how developers can deploy a more complex application while empowering DevOps teams to enforce security and governance without dealing with many of the complexities that traditionally come hand-in-hand with Kubernetes.
For this example, we will use a Cinema application. You can find the source code for the app here: https://github.com/shipa-corp/cinema-application
* For this example, we assume you already have an instance of Shipa running. You can find detailed information on how to install Shipa here: https://www.shipa.io/getting-started/
This is the high-level architecture for this application:
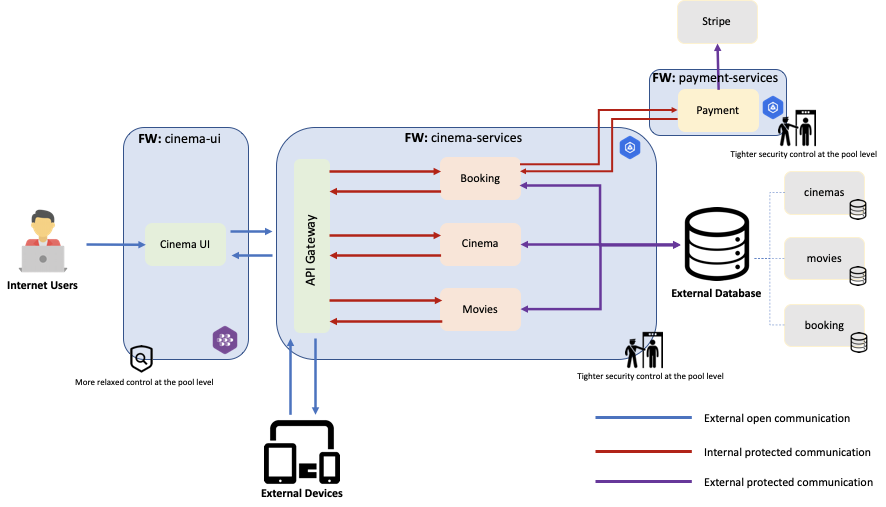
I know there is a lot on this picture, so let’s break things down by role:
For DevOps:
- We have defined 4 Shipa frameworks: cinema-ui, api-gateway, cinema-services, and payment-services
- The framework template for these are: cinema-payment.yaml, cinema-services.yaml, and cinema-ui.yaml
- The reason we broke this into multiple frameworks is because:
- We wanted to show how DevOps teams can enforce different security levels for the different services deployed by the developers.
- This provides isolation between services deployed using the different frameworks.
- While most of the frameworks are hosted on a GKE cluster, one of the frameworks (cinema-ui) is on an AKS cluster. Shipa can also help you deploy apps and services across multiple clusters and providers (on-prem or in the cloud).
For Developers:
- We are using NodeJS for the different services.
- Services connect to an external MongoDB instance where:
- Movies services retrieve a list of movies.
- Cinema Catalog retrieves a list of theaters.
- Payment service connects to a third-party service (Stripe) to perform payment operations.
- Notification receives transaction details and sends them to users by email (fake emailing process for this example)
- Booking connects to both Payment and Notification services to register the purchase of a movie.
- API Gateway service provides centralized communication with the different services and can be called by external services/devices
- UI service provides a user interface that communicates through our API gateway for booking movies.
Creating the MongoDB Databases
Some of the services require a database to persist/read information exposed later on by the API. Therefore, having access to a MongoDB service is needed.
Assuming you already have a MongoDB instance running, here are the steps you can follow to create the required structure for our cinema services:
Movies DB
mongo -u

# Verify if databases already exist
show dbs

# Create your "movies" DB
use movies

# Create a user for the DB
db.createUser(
{
user: "shipau",
pwd: "shipapass"
roles: [
{ role: 'userAdmin', db: 'movies' },
{ role: 'dbAdmin', db: 'movies' },
{ role: 'readWrite', db: 'movies' }
]
}
)

# Exit the current user and log in with the recently created one
exit

mongo -u shipau /movies

# Insert some DB records
db.movies.insertMany([
{"id" : "1", "title" : "Assasins Creed", "runtime" : 115, "format" : "IMAX", "plot" : "Lorem ipsum dolor sit amet", "releaseYear" : 2017, "releaseMonth" : 1, "releaseDay" : 6 , poster: 'assasins-creed.jpg'}
{"id" : "2", "title" : "Gladiator", "runtime" : 124, "format" : "IMAX", "plot" : "Lorem ipsum dolor sit amet", "releaseYear" : 2017, "releaseMonth" : 1, "releaseDay" : 13, poster: 'gladiator.jpg' }
{"id" : "3", "title" : "xXx: Reactivado", "runtime" : 107, "format" : "IMAX", "plot" : "Lorem ipsum dolor sit amet", "releaseYear" : 2017, "releaseMonth" : 1, "releaseDay" : 20, poster: 'reactive.jpg' }
{"id" : "4", "title" : "Resident Evil: Capitulo Final", "runtime" : 107, "format" : "IMAX", "plot" : "Lorem ipsum dolor sit amet", "releaseYear" : 2017, "releaseMonth" : 1, "releaseDay" : 27, poster: 'resident-evil.jpg' }
{"id" : "5", "title" : "Moana: Un Mar de Aventuras", "runtime" : 114, "format" : "IMAX", "plot" : "Lorem ipsum dolor sit amet", "releaseYear" : 2016, "releaseMonth" : 12, "releaseDay" : 2, poster: 'moana.jpg' }
])
Cinemas DB
mongo -u <user> <IP:PORT>

# Verify if databases already exist
show dbs

# Create your "cinemas" DB
use cinemas

# Create a user for the DB
db.createUser(
{
user: "shipau",
pwd: "shipapass",
roles: [
{ role: 'userAdmin', db: 'cinemas' },
{ role: 'dbAdmin', db: 'cinemas' },
{ role: 'readWrite', db: 'cinemas' }
]
}
)

# Exit the current user and log in with the recently created one
exit

mongo -u shipau <IP:PORT>/cinema

# Insert some DB records
mongoimport --jsonArray --db cinemas --collection docs --file ~/your_path/cinema-catalog-service/src/mock/countries.json
mongoimport --jsonArray --db cinemas --collection docs --file ~/your_path/cinema-catalog-service/src/mock/states.json
mongoimport --jsonArray --db cinemas --collection docs --file ~/your_path/cinema-catalog-service/src/mock/cities.json
mongoimport --jsonArray --db cinemas --collection docs --file ~/your_path/cinema-catalog-service/src/mock/cinemas.json
Booking DB
mongo -u <user> <IP:PORT>

# Verify if databases already exist
show dbs

# Create your "movies" DB
use booking

# Create a user for the DB
db.createUser(
{
user: "shipau",
pwd: "shipapass",
roles: [
{ role: 'userAdmin', db: 'booking' },
{ role: 'dbAdmin', db: 'booking' },
{ role: 'readWrite', db: 'booking' }
]
}
)

# Exit the current user and log in with the recently created one
exit
Creating the Shipa Frameworks
Creating the frameworks on Shipa is easy, and you can use the commands below in combination with the framework template files provided as part of the Git repo:
$ shipa framework add cinema-ui.yaml

$ shipa framework add cinema-services.yaml

$ shipa framework add cinema-payment.yaml
Once created, you can bind these frameworks to either a single cluster or multiple clusters. In our case, we attached them to a GKE and an AKS cluster.
You can find more information on how to connect clusters and bind frameworks to them here: https://learn.shipa.io/docs/connecting-clusters
Cinema Services
Now that we have our MongoDB setup and the Shipa frameworks ready and bound to Kubernetes clusters, we can start creating and deploying our different cinema services.
As we create and deploy some of the cinema services, we will also be setting up required ENV variables to connect to databases and third-party services (Stripe).
* To make the process easier, we will use pre-built Docker images, but the Dockerfiles are available in the Git repo in case you want to recreate the images
Movies Service
$ shipa app create movies-service -t shipa-admin-team -o cinema-services

$ shipa env set -a movies-service DB_SERVER=<MongoDB IP:PORT> DB_USER=shipau DB_PASS=shipapass DB=movies

$ shipa app deploy -a movies-service -i gcr.io/cosimages-206514/movies-service@sha256:da99b1f332c0f07dfee7c71fc4d6d09cf6a26299594b6d1ae1d82d57968b3c57
Cinema Catalog Service
$ shipa app create cinema-catalog -t shipa-admin-team -o cinema-services

$ shipa env set -a cinema-catalog DB_SERVER=<MongoDB IP:PORT> DB_USER=shipau DB_PASS=shipapass DB=cinemas

$ shipa app deploy -a cinema-catalog -i gcr.io/cosimages-206514/cinema-catalog-service@sha256:6613440a460e9f1e6e75ec91d8686c1aa11844b3e7c5413e241c807ce9829498
Notifications Service
$ shipa app create notification-service -t shipa-admin-team -o cinema-services

$ shipa app deploy -a notification-service -i gcr.io/cosimages-206514/notification-service@sha256:ca71c0decb3e9194474b9ea121ab0a3432b57beb07f9297fa1233f8f3d6a2118
Payment Service
$ shipa app create payment-service -t shipa-admin-team -o cinema-payment

$ shipa env set -a payment-service DB_SERVER=<MongoDB IP:PORT> DB_USER=shipau DB_PASS=shipapass DB=booking STRIPE_SECRET=your_secret STRIPE_PUBLIC=your_token

$ shipa app deploy -a payment-service -i gcr.io/cosimages-206514/payment-service@sha256:b1c311b37fb6c74ef862e93288aa869f014e7b77e755a4d71481fe5689204d31
Booking Service
$ shipa app create booking-service -t shipa-admin-team -o cinema-services

$ shipa env set -a booking-service DB_SERVER=<MongoDB IP:PORT> DB_USER=shipau DB_PASS=shipapass DB=booking NOTIFICATION_API_HOST=<Notification-app-internal-dns>:3000 PAYMENT_API_HOST=<Payment-app-internal-dns>:3000

$ shipa app deploy -a booking-service -i gcr.io/cosimages-206514/booking-service@sha256:e639bfc7c0926be16f6b59214cc0753d47b168e342bea5e2d34d8f47dbdded27
Note that you will need to supply the internal endpoint for the Notification services and the Payment services for the Booking service ENV variables so that Booking can communicate with both. You can find both in your service’ application page for both services:
For my notification-service application:

For my payment-service application:

When setting the ENV variables above, we want to use the Internal DNS for both services.
API Gateway Service
$ shipa app create api-gateway -t shipa-admin-team -o cinema-services

$ shipa env set -a api-gateway API_BOOKING=booking_internal_dns API_MOVIES=movies_internal_dns API_CINEMA=cinema_catalog_internal_dns

$ shipa app deploy -a api-gateway -i gcr.io/cosimages-206514/api-gateway@sha256:ea7e9efe455f634ab3d9abaae361717c771a9bf4ab8881d005d3cf4b10195e1a
As with the previous service, the API Gateway requires you to add the Internal DNS endpoints for the Movies and Cinema Catalog services, which you can find on the service’s page.
UI Service
The UI app is a Frontend application built in React that interacts with the API client-side (through the browser), so it requires the API gateway to be opened to incoming traffic from endpoint exposed by Shipa” or something around that
$ shipa app create ui-service -t shipa-admin-team -o cinema-ui

$ shipa env set -a ui-cinema REACT_APP_API_SERVER=api-gateway-endpoint

$ shipa app deploy -a ui-service -i gcr.io/cosimages-206514/ui-cinemas@sha256:81f61cf1368b65e90a70637f9aa1c25ed741495d391cbbcea807d031e0c2a5e3
You can see that the UI service needs the API Gateway endpoint to communicate with it as part of the ENV variables that you are setting above.
Suppose you follow my example where the UI service is deployed through a framework hosted in a different cluster. In that case, you should use the Endpoint (external) URL provided in the API Gateway service page:

If you decided to have all frameworks in the same cluster, then you can use the Internal DNS address of your API Gateway service:

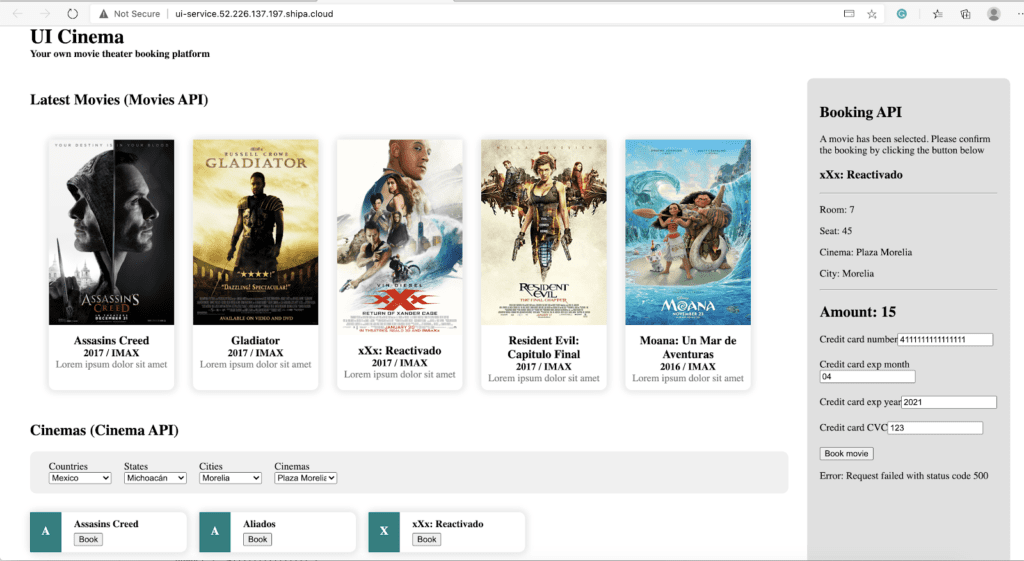
Once the services are all deployed, you can access our Cinema web page to start booking movies using the UI service Endpoint.
Network Policies
One of the optional steps you can take is to define network policies to protect the services we just deployed. Defining network policies on Kubernetes can be quite tricky, but Shipa has made it easy.
* For network policies to work on Shipa, you have to make sure Network Policies are enabled in your Kubernetes cluster where the Payment service and Shipa framework are hosted
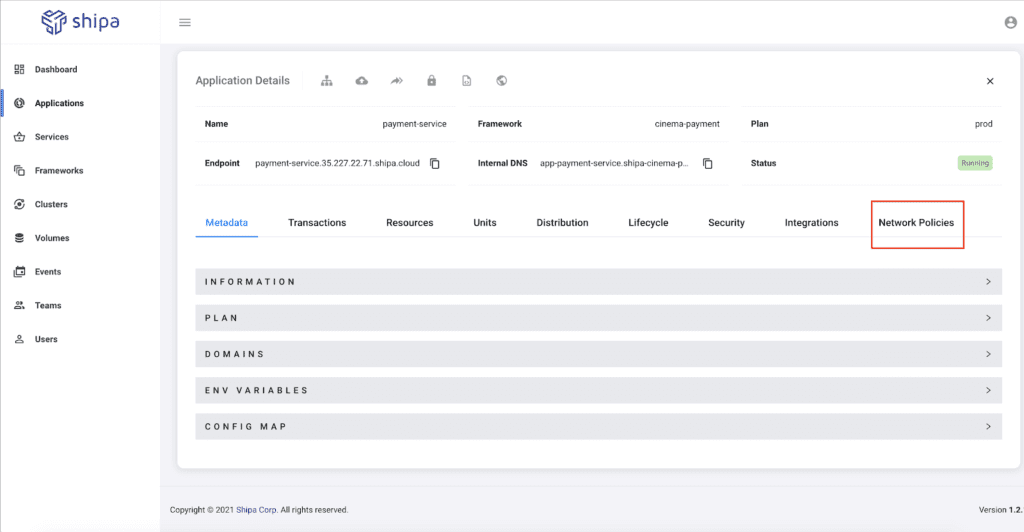
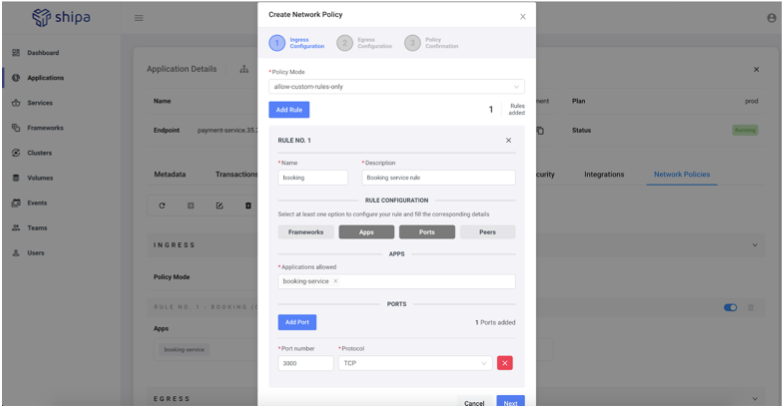
Let’s set up network policies for the Payment service as an example since our payment service can be considered a critical app that needs to be secured.
To do so, we can go to the Payment service application page and click on Network Policies:
Once on the page, click on the “+” button to create a policy.
Since our Booking service is the one sending and receiving data to our Payment service, we can then build a policy that will allow our Payment service to receive data (ingress) only from Booking and only through port 3000:
For now, we can leave our egress with allow-all, but you can also specify egress rules to make sure data is sent to only allowed apps or endpoints:
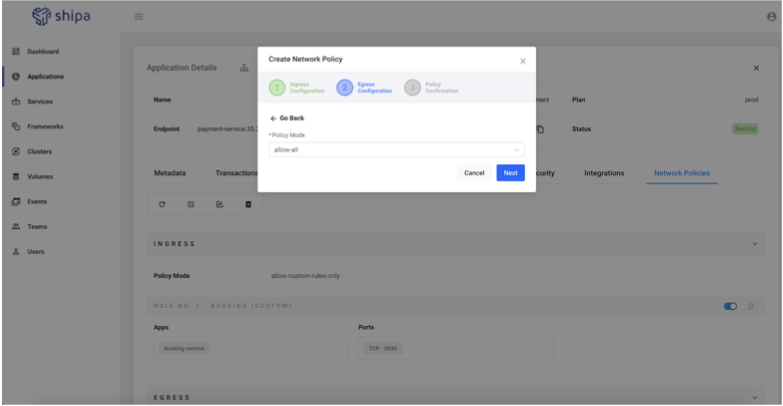
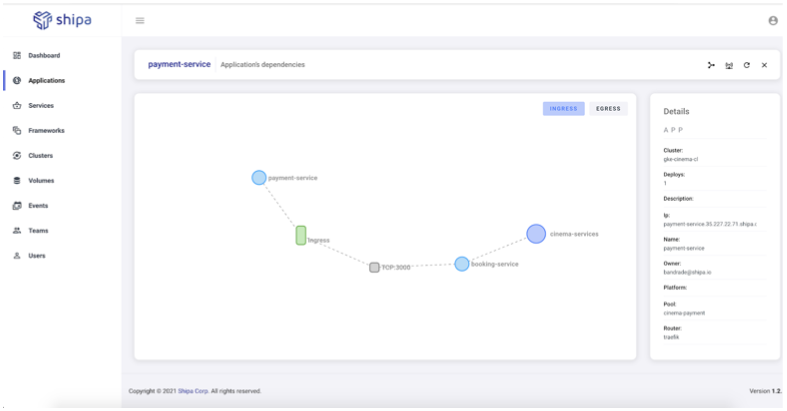
Once complete, Shipa will restart the Payment service to ensure the network policies are applied. You can see this using Shipa’s network map:
You can define additional policies as you desire, but this is an example of how easy it is to control policies through Shipa.
In the end, we:
- Deployed a complex application on Kubernetes without actually knowing Kubernetes or even having to touch kubectl as a developer!
- We secured our services across multiple clusters and vectors, including security scans, network policies, RBAC, and more.
In the next post, we will show you how to connect this into your CI Pipeline and operate it through GitOps.
Resources:
Get Started with Shipa: https://www.shipa.io/getting-started/
Cinema application: https://github.com/shipa-corp/cinema-application
Framework templates:
Shipa home: https://www.shipa.io